...
The Id is the internal reference to this Notification Delivery. The Save button is self-explanatory. The back button goes back to the list of Notification Deliveries.
Field Name | Details |
|---|---|
Id | Ignore - internal reference; you can ignore |
Notification Delivery Name | This is required and is the name you would like to give to the Notification Delivery. |
Enabled | Whether this Notification Delivery is Enabled, it’s disabled by default. |
Note | This is a multi-line field that you can leave a note for someone about this Notification Delivery. Putting who to contact, who owns this Notification Delivery, and other details could really help other people and new hires. Especially things like Slack, where when a person leaves, the permissions can go completely bat crazy. |
Notification Delivery Expiry | Future feature: To expire this Notification Delivery after a certain amount of time has expired. |
Company Name | This will be your Company Name by default if you don’t set it. If you manage Partners or other companies, you can select where this Notification Group gets created. |
Notification Delivery Role | Future - this will allow you to have different people editing this Notification Delivery. |
Notification Type | |

Figure 3a, Email Settings As explanatory as putting your seat belt on in the plane, just put it in the email to receive your notifications. Make sure notifications@ctci.ai is allowed. |
Slack |


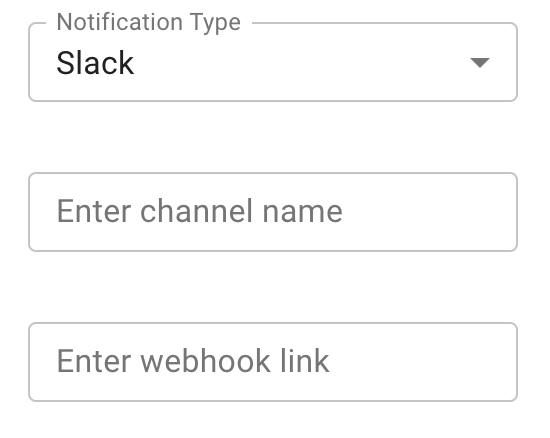 Figure 3b, Slack Settings With Slack, the channel name is optional. This is if you want it to go to a different channel than the webhook but has the same permissions. Most users will use the webhook link; however, we supported the channel name supported in their API. | |
Teams | 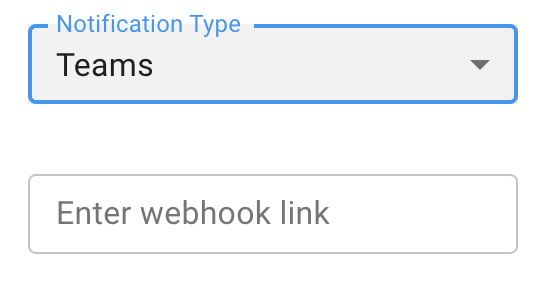 Figure 3b, Teams Settings With teams, there is only a webhook. Unlike Slack, you cannot override the channel to which you send the messages. |
Jira | 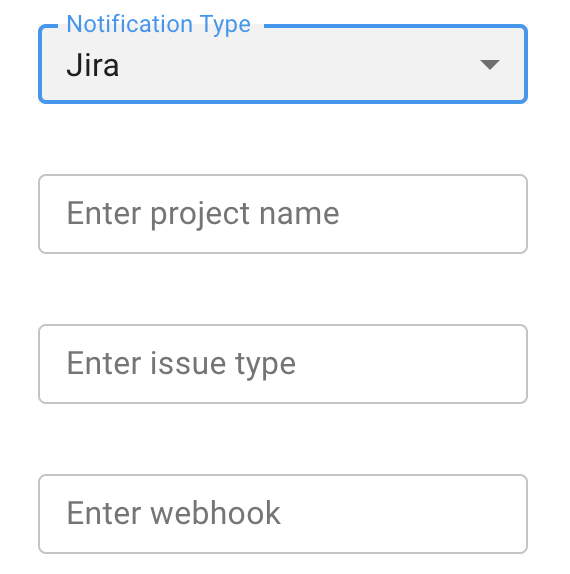 Figure 3b, Jira Settings This is the Jira setting; every value is compulsory. We support Jira Cloud and external Internet-facing Jiras. If you have on-premise, then there is an easy way to do this by scheduling a python program to get the list and create the tickets in Jira. (See section below for how to setup Jira to handle CEWL notification) |
Webhook | Future - Backend is working. If you want to do Webhook, we can set this up for you in the backend. |
Jira and CEWL Automation
Jira is great at workflow, CEWL is great at what threat actors are doing, we think they make a great match.
Setting up Jira
Go to project settings and click on the automation menu option.
Create an incoming webhook, like below:
...
Have it set for no issues from webhook, it doesn’t make sense that we update CVE entries in CEWL.
We suggest you create a CVE issue type ( call it whatever makes sense for you), then have custom fields that cover what is in the data sent. We support all the fields show in the CEWL entries field descriptions.
Then on the incoming webhook do a create new Issue.
...
You want to map the data fields coming into the fields created with Jira. How to do this is to use the {{webhookData.<fieldname>}} in the mapping. So to set Vendor to vendor from the webhook request, you would put in the field definition, {{webhookData.vendor}}.
We send all the fields for a Jira ticket that is created for every new CEWL entry. For sending all notifications at a time this is not supported.
How to Edit a Notification Delivery
...